Thursday, October 29, 2009

Basic Elastix Setup

Tuesday night found me setting up a home Elastix box, really for no other reason but to learn how. I had a LinkSys SPA942 phone to use and a Pennytel account which I was already using through a Sipura. To get the phone to talk through the Elastix box, ended up being super easy.

Installing Elastix was no problems at all. Just follow the simple steps and it installs. Elastix has a SUPER nice web interface, so I simply went to the address of the new Elastix install from Firefox on another machine and did all the administration from it. The username and password for the web server is a little odd, but can be found on the Elastix web site under their Installation Instructions. (http://www.elastix.org/index.php?option=com_openwiki&Itemid=27&id=installation)

Username: root
Password: palosanto

Side Note: Why palosanto? PALOSANTO SOLUTIONS started the Elastix project a few years ago ;)

Anyways, when you log into the Elastix web interface, you find that there are quite a few options. PBX Configurations, Extensions, Outbound Routes, Trunks, IM, Billing, Email, Reports ........ and the list seems to go on. Elastix has a great number of different options which is why it is so nice to use. However, to set up a single phone and get it making calls, or even setting up multiple phones and having them make calls, is quite easy as I discovered.

I've broken it up into 4 simple steps.

Step 1. Set up the phone.
When you plug the phone in to the network, it SHOULD come up with an IP address. This will come from your DHCP server. Most phones will have a web interface and it's recommended you use it. You CAN set the phone up AT the phone, but it's much easier to use a mouse and keyboard. At this point, I again logged into the phone from a remote machine (the same one I was accessing the Elastix web interface from) The most important part of setting up the phone, is to set it's extension number, the proxy and the password. On the SPA942, you need to go Advanced and then go to Ext 1 to see where these settings are. The screen looks similar to this:


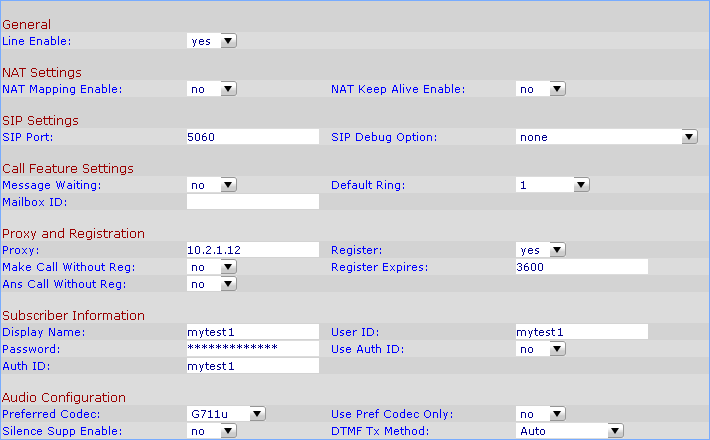
The extension number you can make up yourself. In my case, I used 103. This number goes in the User Id. The proxy becomes the IP address of the Elastix box. Just set the password that the Elastix box will use to register the phone.
The phone is now set up :)

Step 2. Set up the extension and make the phone register.
Go back to the Elastix web interface. Go to PBX Configuration -> Extensions and click on [Add Extension].

Set a display name. It is just the name that will appear on the phone when it registers.

Next, set the extension number. This NEEDS to be the same as the extension number (User Id) you put on the phone. This is how elastix distinguishes between the phones.

You now need to set the field called "secret". This REALLY means password. The password needs to be the same as the password that corresponds to the password on the phone.

Click on Submit to save the changes. You will then get an option just under the tabs, to [Apply the changes]. Click on that. Your phone should now recieve the new information from Elastix and register itself. If you want to be sure, just cycle the power on the phone. On the SPA942, the 4 buttons down the right side of the lcd screen turn green when it's registered with Elastix.

Step 2. Set up the Trunk.
While still in the PBX Configuration, go to Trunks and click on [Add SIP Trunk].

The "Trunk" is the part in VOIP that tell Elastix to pass a call through this connection. This is where you put in all the details of your VOIP provider. In my case, it was Pennytel.

The first step is to give the Trunk an outbound caller id. Put it in the format of ["Caller Name" ]

I also had to add some dial rules. I wanted all 8 digit phone numbers to be treated as local calls, so I forced the area code in front of the number by adding a dial rule of [07+XXXXXXXX]

I really wanted to see if I could make calls, so I made my first Trunk an Outbound trunk. So all I needed to do next was put in the Outbound Peer Details. Simply delete all the default information in the field and enter in the information provided by your VOIP provider. I'm with Pennytel, so my Peer Details are;

disallow=all
allow=ulaw&alaw
canredirect=no
host=sip.pennytel.com
insecure=very
qualify=yes
secret=your password
type=peer
username=your Pennytel sip number or DID number

Step 3. Set up the Out bound route.
The Outbound Route ties certain phone numbers with trunks. This means you can send different phone calls through different providers.

From the PBX Configuration menu, click on [Outbound Routes]. Add a new outbound route. Firstly, give the outbound route a recognisable name. I set up 2 outbound routes just for laughs. The first one was a "Local" OR and then a "Mobile" OR. I linked both of those OR's to the trunk I created and had to set some phone number rules and then I was away, making phone calls from the newly setup Elastix box.

Sunday, September 27, 2009

Wiikey V2 vs Wii Sports Resort

DISCLAIMER: I am NOT an expert on this. These are just my views, observations and results based on my own efforts to find information and upgrade the firmware on my console.

After installing the Wiikey V2 in March 2009 (about 6 months ago) I've gotten away without having to update the Wii firmware up till now. I never had a need. There were no games out there that grabbed my attention enough to make me want to go, "YES! I need this game." I found that the games I enjoyed, didn't need an update and any that did, I wasn't interested in ENOUGH to risk bricking my Wii through a bad update.

That was, up until now. Wii Sports Resort changed all that. I've played it a number of times on other machines and absolutely love it. It is one of those must have games IMO. But to play it, I was faced with a dilema. I've heard all the horror stories of "bricking your Wii" due to conflicts between the Wiikey and the firmware. I know all about the lovely firmware that Nintendo released that detected the Wiikey and broke everything. So, I'd be lying if I said I wasn't a little concerned about updating the Wii firmware. And finding an exact answer on the topic on the internet felt like wading through pages and pages of some sort of policitical party's promises full of "he said she said" and old out dated information that had little to nothing to do with my situation.

Which brings me to the reason for this blog. To update the firmware on your Wii for Wii Sports Resort when you have a Wiikey V2 installed, you need to have the firmware of your Wiikey up to 1.9s. This is the first obstacle I came across. How the hell do I find out what version of the firmware my Wiikey is on? Well, short answer, you can't. Sux to be you or me in this case. This is where things started to become educated guesses, but hopefully this will help you too. The firmware 1.9s for the Wiikey V2 was released in March 2008. (Go here for info: http://wii.qj.net/WiiKey-Firmware-update-v1-9s-released/pg/49/aid/116835) So my assumption was that any new Wiikey V2's purchased after that date from a reputable dealer SHOULD have the latest firware (1.9s) installed on it. My Wiikey was installed in March 2009. Oh happy days.

Some of the nice features of the Wiikey V2 is that it "has an inbult update blocker that allows you to block updates from NTSC game, which means you cannot brick your console by accident! [And] Upgradeable/configureable via DVD. Tthe modchip's SPI flash (where all the game authentication is stored) is 100% upgradable via a DVD." (Retrieved September 28, 2009, from http://www.ozmodchips.com/wiikey-v2-installation-1075-only-p-181.html) So I just needed to make sure that the dvd that I was upgrading my firmware from, was a PAL game. I simply got hold of a purchased version of Wii Sports Resort and ran the update and I was ready to go.

At this point, I'd like to add some notes. You can configure the Wiikey by downloading the Config disk and running it on the Wii. If you do, make sure you've ONLY enabled updating of the Wii firware according to the region you purchased the Wii (http://www.wiikey.cn). My recommendation is, DON'T update your Wii firmware from a downloaded game. I don't think you can EVER be certain that the game really is from the region you believe it is. And EVENTHOUGH Wiikey promises to not allow the update from a different region, can you really ever be sure? Would YOU risk a broken console over it?

In the end, make sure the firmware of your Wiikey V2 is 1.9s. If it isn't, download the update and install it (Look at afterdawn.com). Once you've done this, you SHOULD have no problems updating from the game DVD. (When I started, I didn't even know this :p)

Best of luck.

Wednesday, June 17, 2009

Web Page Load Speed

One of the things I've done in the past, especially for coding and ease of finding the information, I like to break up my css into separate files, into smaller more manageable files. Generally each class (php class) or section of the page is broken up into these files. I've also done a similar thing with my javascript files. However, one thing I've learnt lately is that loading 20 different files into the home page rather than 1 css file and 1 js file, causes a HUGE difference in load times.

Even white space in my code can cause a difference of seconds in loading a page. It starts to make sense why code that I download from the net is in one or two lines with very few spaces ;)

Tuesday, June 16, 2009

IE vs The Rest Of The World

You've just gotta love how you can create a web page and in almost EVERY web browser, it just works (so long as you've followed the standards) but with IE, most of the time, it just doesn't. And THEN, (and this is my favourite) it might work in 8, but probably have broken parts in 7 and MORE THAN LIKELY, just be absolutely stuffed in 6.

OK... so here's some of my little tidbits I've found for fixing some web pages in IE.

First off, Version 6.
1. Setting a height of 100% just WILL NOT WORK, unless you set the height of the parent div.
2. Remember, png's aren't supported until version 7. You will need to use something like a "iepngfix.htc" file to fix this issue.
3. position:fixed doesn't work. AT ALL. The work around here is to use an absolute.

Version 7.
1. clear:both doesn't work. The best solution is to set a min-height in the div BEFORE where the clear:both is called.

Thursday, June 11, 2009

ExtJS Tabpanels and Forms

Three days, that's right, three days I've been googling and wrestling with this problem. How do I put a form, inside a tabpanel, inside a form, inside a tabpanel? No, I didn't write that too many times, what I'm after is a set of components inside a tabpanel inside a parent tabpanel. It's simply tabs inside tabs. Not something that I think is good practice, however, something I needed to do.

I pulled it apart to it's most primary issue, a form with a tabpanel in it with components inside a tab page. Here's the thing, YOU CAN'T. Well, not that I could find. The secret is, add the tabpanel to a panel NOT a formpanel. Apparently you can not nest form panels inside form panels. A FormPanel is a mixture of a Panel with form layout and a BasicForm object. You can only have one BasicForm in a hierarchy, so you need to just use normal panels in a form layout in children.

var ParentForm = new Ext.Panel({
labelAlign: 'side',
border: false,
frame: true,
autoHeight:true,
layout: 'column'});

var MyTabPanel = new Ext.TabPanel({
width:400,
height:300,
frame:true,
deferredRender:false
});

var MyTabSheet = new Ext.Panel({
title: 'New Tab',
autoHeight: true });

var MyTabSheetForm = new Ext.FormPanel({
labelAlign: 'side',
border: false,
frame: true,
width: 300,
layout: 'column',
height: 300,
items:[{
xtype:'textfield',
fieldLabel: 'Office Switch',
name: 'switch',
anchor:'95%'}]
});

// ---- add the tab sheet to the tab panel
MyTabPanel.add(MyTabSheet);

// ---- set the active tab
MyTabPanel.setActiveTab(0);

// ---- add the formpanel to the tabsheet
MyTabSheet.add(MyTabSheetForm);